How to Use a VPN on Apple TV: Step-by-Step Guide
Table of Contents
Why Use a VPN on Apple TV?
Streaming your favorite movies and shows is now easier than ever, especially with devices like Apple TV. Just turn on your TV, pick a streaming platform, and start watching!
However, sometimes, geo-restrictions can block access to specific content depending on your location. This is where knowing how to use a VPN on Apple TV becomes very beneficial.
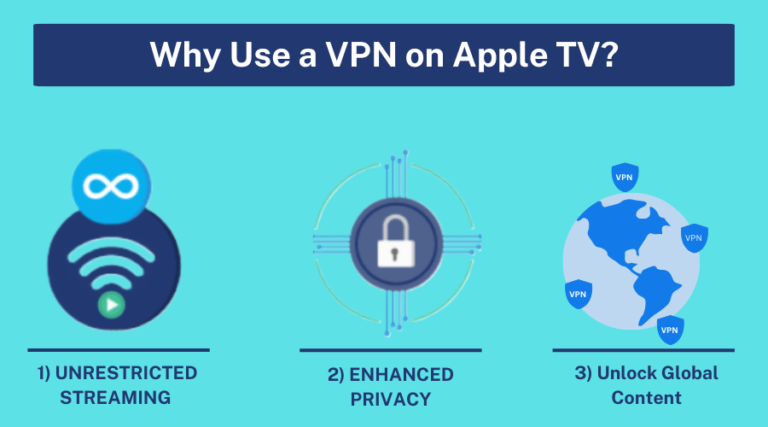
A VPN, or Virtual Private Network, masks your real location by routing your internet connection through a server in a different country. This makes it appear you’re browsing from that server’s location, allowing you to bypass these restrictions and enjoy a wider range of content.
This guide will show you how to use a VPN on Apple TV to bypass these restrictions and unlock a world of content. You can install a VPN application directly on your Apple TV, set up a VPN on your router, use Smart DNS, or choose a VPN with native Apple TV support.
With these methods, you can enjoy your favorite shows and movies from any streaming service, no matter where you are. So, let’s look at how to set up a VPN on your Apple TV.
How to Set Up a VPN on Apple TV: Quick Guide
You can use several methods to set up a VPN on Apple TV, each with unique advantages depending on your setup and requirements. I have included a quick guide of the most popular methods to give you an overview of what we’ll cover next.
|
Methods |
Description |
|
1. Set up an Apple TV VPN app |
Directly install a VPN app on Apple TV (limited to certain models). |
|
2. Set up a VPN on your router |
Configure a VPN on your router to cover all devices, including Apple TV. |
|
3. Set up a VPN with SmartDNS |
Use SmartDNS to reroute traffic and bypass geo-restrictions without full encryption. |
|
4. Connect Apple TV to VPN via Wi-Fi hotspot |
Share a VPN connection from your Windows PC by setting up a Wi-Fi hotspot. |
|
5. Mirror or cast from Mac or iOS |
Use AirPlay to mirror or cast content from a VPN-enabled Mac or iOS device to Apple TV. |
How to Set up a Best Apple TV VPN Apps?
Downloading an Apple TV VPN app is the simplest way to install the service and get started. Although the specifics might differ based on your VPN provider, the overall process is the same. First, you will require a VPN subscription with an app compatible with Apple TV.
Choosing the right VPN is crucial for a smooth and secure experience. Based on our tests, NordVPN and Surfshark VPN are excellent options, offering robust features tailored for Apple TV users.
1) NordVPN

NordVPN is renowned for its fast speeds and extensive server network, which spans over 60 countries. This makes it a top choice for streaming, as it can easily bypass geo-restrictions and maintain high-quality video playback.
NordVPN also offers SmartDNS, a feature perfect for Apple TV users who want to access global content without configuring the VPN on their router.
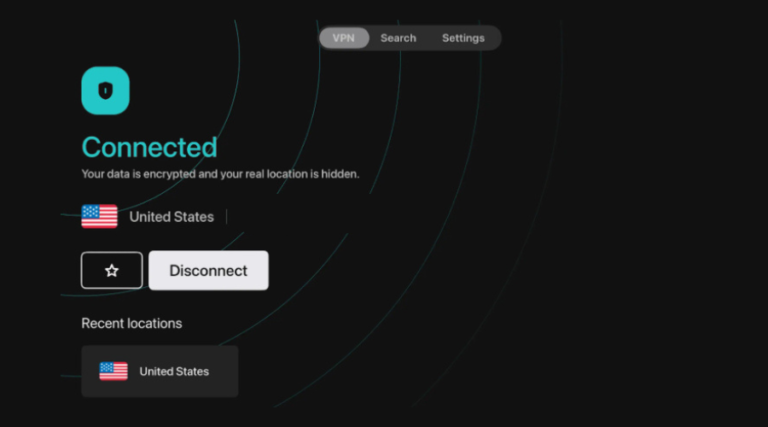
There are 4 simple steps to set up NORDVPN for Apple TV.
- Find a NordVPN app on Apple TV.

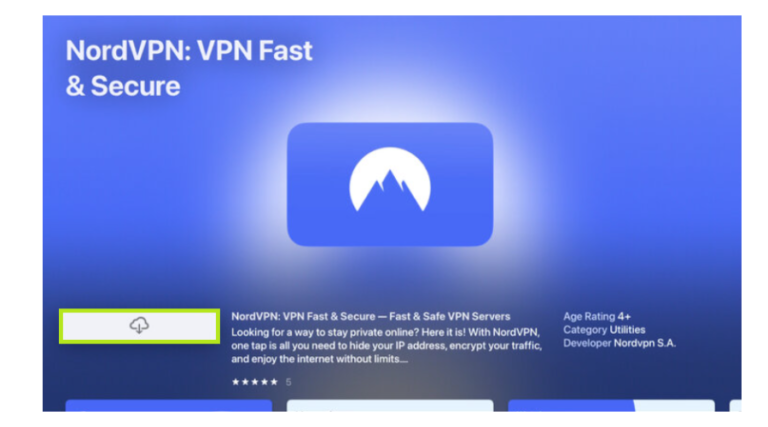
2. Install the NordVPN from the App Store.
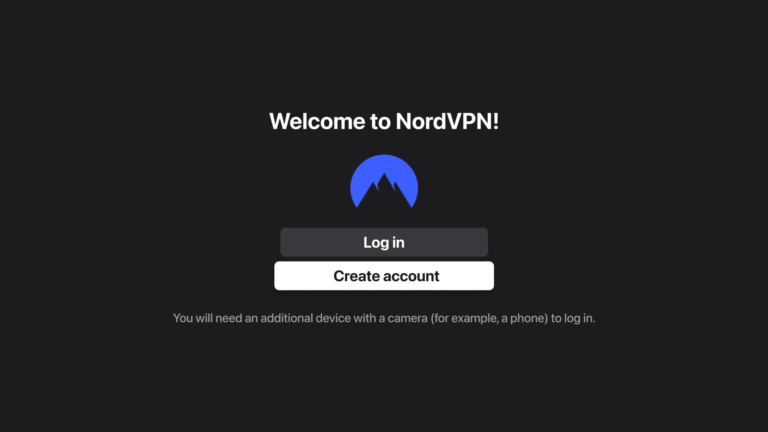
3. Log in and connect to a VPN server.
4. Once you have logged in, connect to a country of your choice.
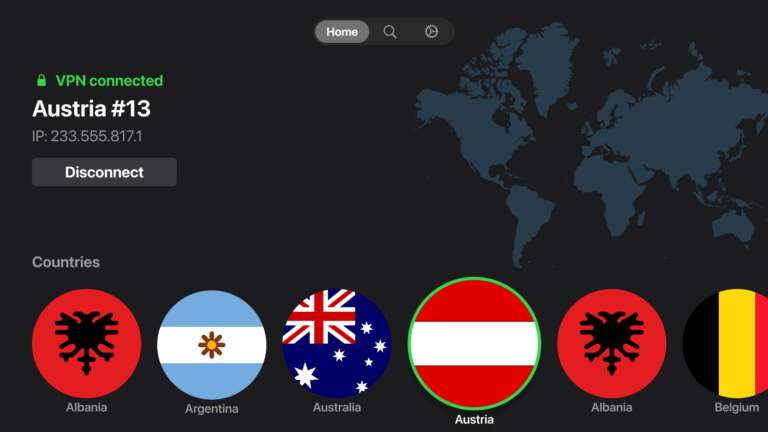
2) Surfshark VPN

Surfshark VPN offers unlimited simultaneous connections, making it ideal for households with multiple devices. It’s also one of the more affordable options without compromising security or speed.
Surfshark’s CleanWeb feature blocks ads and malware, ensuring a smoother streaming experience on your Apple TV. Plus, it provides an easy-to-use SmartDNS option.
There are 4 simple steps to set up Surfshark VPN for Apple TV.
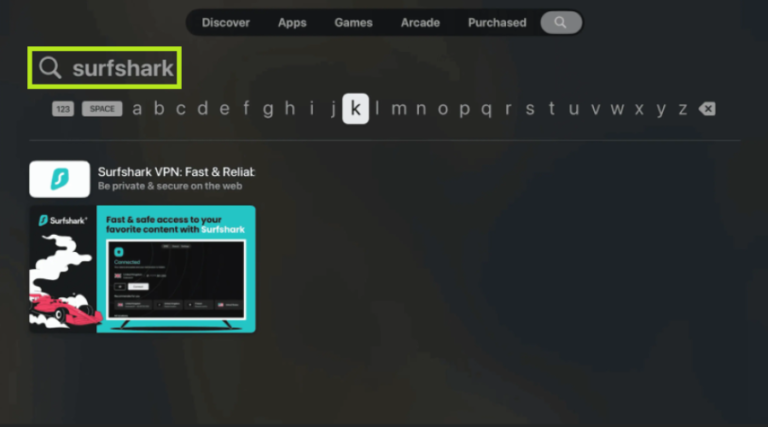
- Visit the Apple App Store and Download a VPN
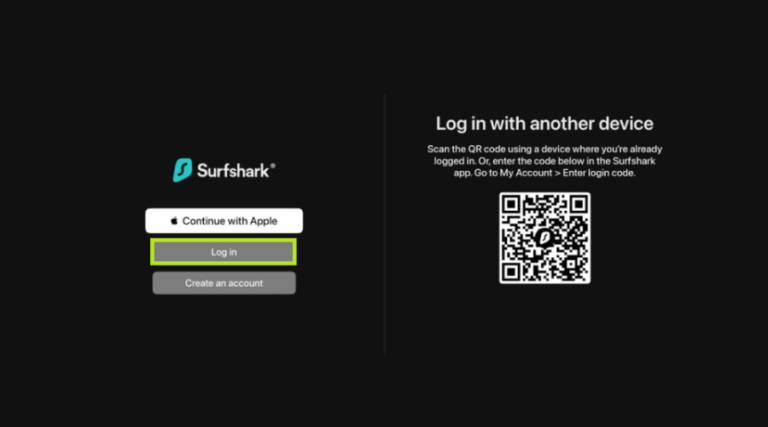
2. Log in to the VPN App
3. Connect to your server of choice.
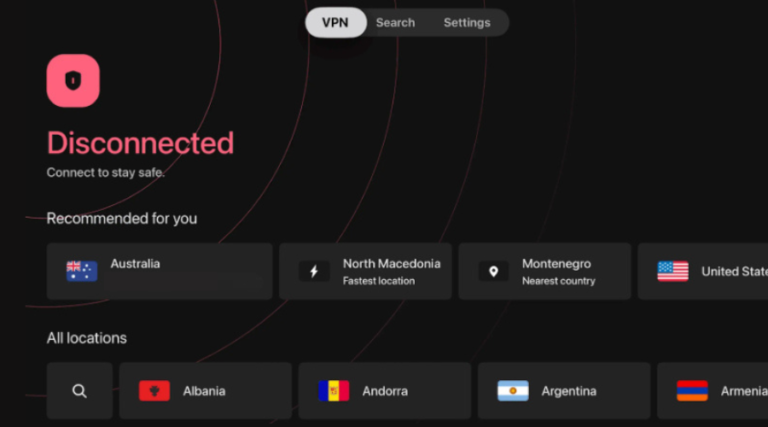
4. Once Connected, Start Watching Apple TV
How to Set Up a VPN on Apple TV [4 Alternate Methods]
If you want to use a VPN on your Apple TV but it doesn’t have a built-in VPN app, you can still achieve this through several alternative methods.
Each method has its steps and requirements, so it’s important to choose the one that best fits your setup. We have compiled a list of the best VPNs for Apple TV to help you find the top options available for every need.
Here’s a detailed guide on how to set up a VPN on Apple TV using four alternate methods:
1. Set up a VPN on Your Router
One effective way to ensure that every device connected to your network, including Apple TV, has a VPN is to set one up on your router. Here’s how you can do it:
Step 1: Choose a VPN-Compatible Router
Not all routers support VPN configurations, so first, you’ll need to ensure your router is compatible. Routers that run Open-WRT, Linksys WRT, or Asus WRT firmware are often the best options.
Step 2: Sign Up for a VPN Service
Before configuring your router, you need an active subscription to a VPN service like NordVPN and Surfshark VPN.
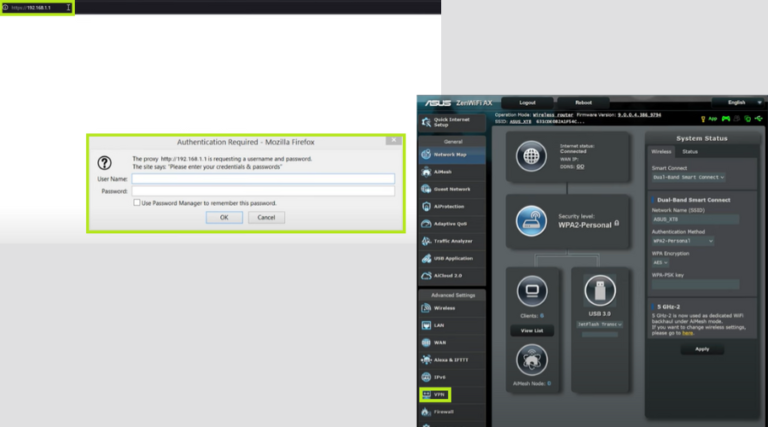
Step 3: Access Your Router’s Settings
Log in to your router’s admin panel. Typically, this can be done by entering the router’s IP address (usually something like 192.168.1.1 or 192.168.0.1) into your web browser. Once logged in, navigate to the VPN settings section.
Step 4: Enter VPN Settings
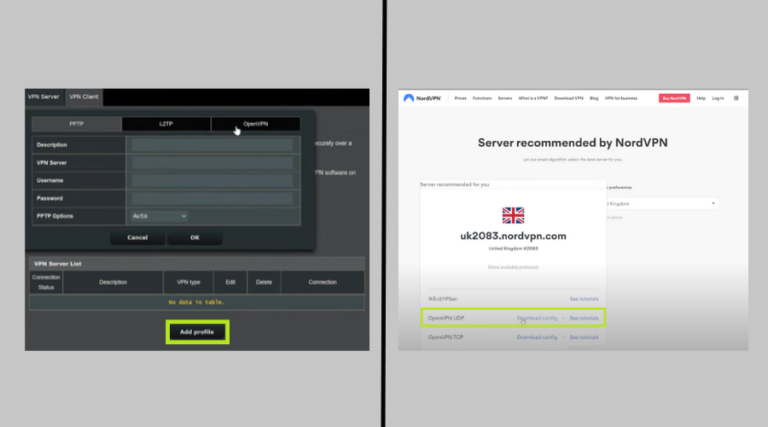
Here, you’ll need to enter details provided by your VPN service, such as the VPN server address, your login credentials, and specific settings like encryption protocol (e.g., OpenVPN Config File).
Step 5: Apply the Settings
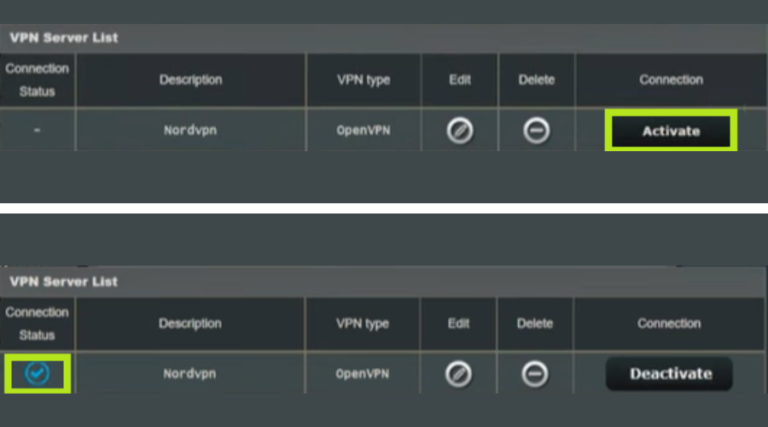
Save and apply the settings. Your router will now route all internet traffic through the VPN server.
Step 6: Connect Apple TV to Your Router
Connect your Apple TV to the Wi-Fi network broadcasted by the router. Your Apple TV will now be connected to the VPN, allowing you to access geo-restricted content securely.
2. Set up a VPN with SmartDNS
SmartDNS is a feature provided by many VPN services that allows you to unblock geo-restricted content without encrypting your entire internet connection.
This is particularly useful for streaming on Apple TV as it usually results in faster speeds. Here’s how to set it up:
Step 1: Choose a reliable VPN provider that offers SmartDNS
Make sure your VPN service offers SmartDNS. NordVPN, Surfshark, and ExpressVPN all provide this feature. We recommend NordVPN.
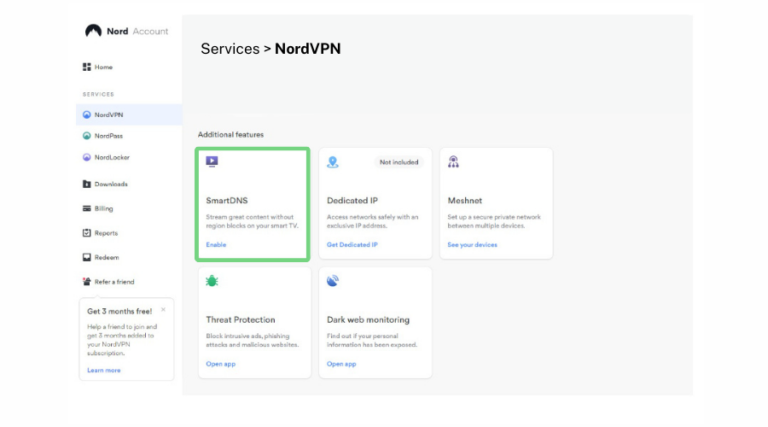
Step 2: Go to your VPN provider’s website and log into your account.
Log in to your VPN account on their website, and find the SmartDNS setup instructions.
Step 3: Get the SmartDNS Server Address
In the settings, enable the SmartDNS feature and whitelist your IP address. You can find your IP address by typing “what’s my IP” into your browser.
Step 4: Configure Apple TV DNS Settings
On your Apple TV, go to Settings > Network. Select your network (Wi-Fi or Ethernet) and then click on Configure DNS. Change it from “Automatic” to “Manual” and enter the DNS server address you got from your VPN provider.
Step 5: Restart Your Apple TV
After changing the DNS settings, restart your Apple TV. This will activate the SmartDNS configuration. Your Apple TV is now set up with SmartDNS, allowing you to bypass geo-restrictions and stream content from other regions.
3. Connect Apple TV to VPN via Wi-Fi Hotspot
If you don’t want to set up a VPN on your router & smart DNS, another option is to share a VPN connection from your Windows PC by creating a Wi-Fi hotspot. Here’s how you can do it:
Step 1: Set Up a VPN on Your Windows PC
First, install and connect to your VPN on your Windows PC.
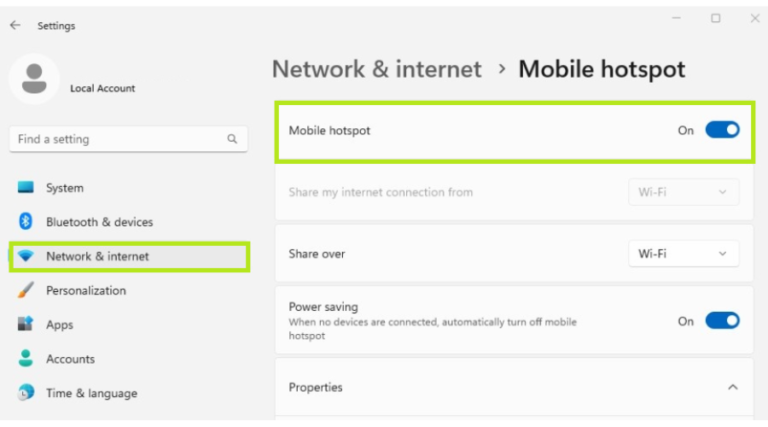
Step 2: Choose Network & Internet and click on Mobile Hotspot.
Open the Settings on your Windows PC, and go to Network & Internet > Mobile hotspot. Turn on the Mobile hotspot feature and choose the network you want to share (your VPN connection).
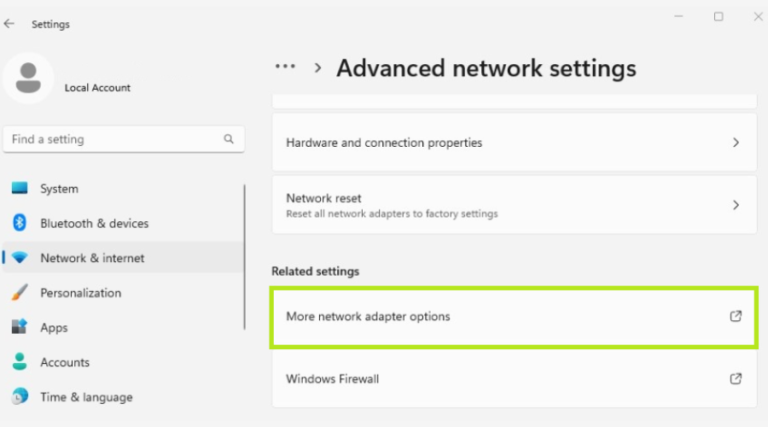
Step 3: Scroll down and click on Change adapter options.
Still in the Network & Internet settings, go to More network adapter options.
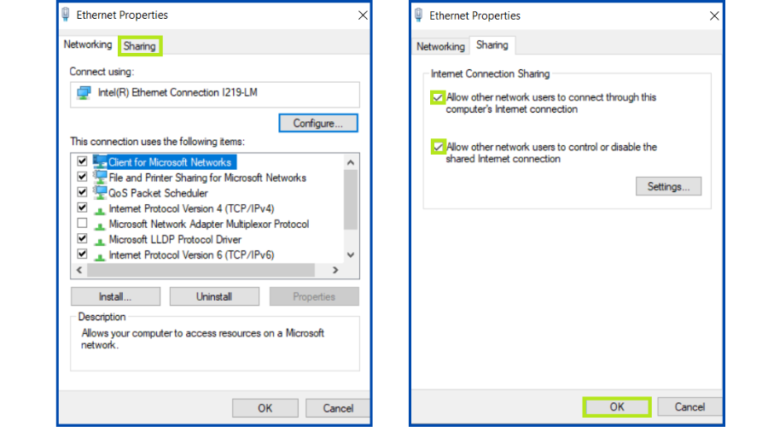
Step 4: Find your VPN adapter.
Right-click on your VPN connection and select Properties > Under the Sharing tab, check the option “Allow other network users to connect through this computer’s Internet connection” > select the Wi-Fi hotspot you just created.
Step 5: Connect your Apple TV to the Mobile Hotspot
On your Apple TV, connect to the Wi-Fi network you just created on your Windows PC.
4) Mirror or Cast from Mac or iOS
If you prefer a simpler setup, you can use AirPlay to mirror or cast content from a VPN-enabled Mac or iOS device to your Apple TV. Here’s how:
Step 1: Install and Connect to a VPN on Your Mac or iOS Device:
Begin by installing a VPN on your Mac or iOS device and connect to a server.
Step 2: Connect to the Same Wi-Fi Network:
Ensure your Mac and Apple TV are connected to the same Wi-Fi network.
Step 3: Enable Screen Mirroring:
Look for the mirroring icon on your Mac’s screen, click it, and select your Apple TV to start mirroring.
Step 4: Check System Preferences if Needed:
If you don’t see the mirroring icon, go to System Preferences on your Mac and click on Display.
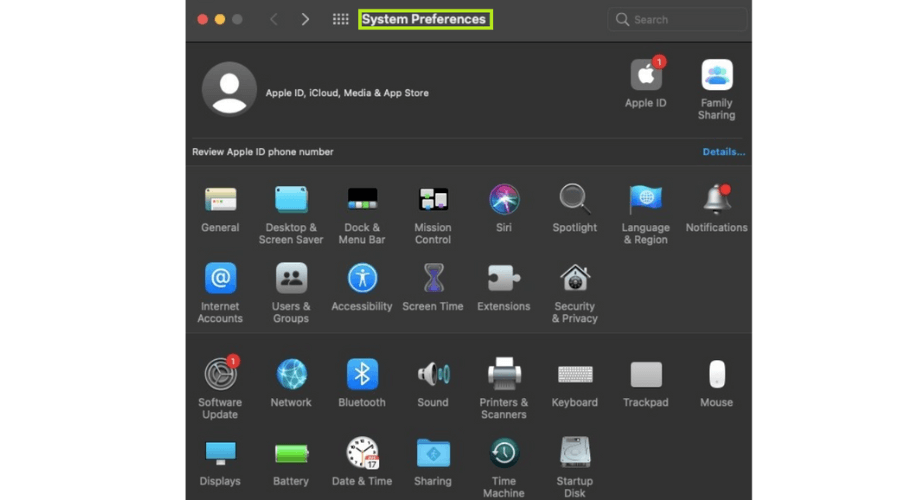
Step 5: Select Apple TV in AirPlay Display:
Choose Apple TV from the AirPlay Display drop-down menu in the Display settings.
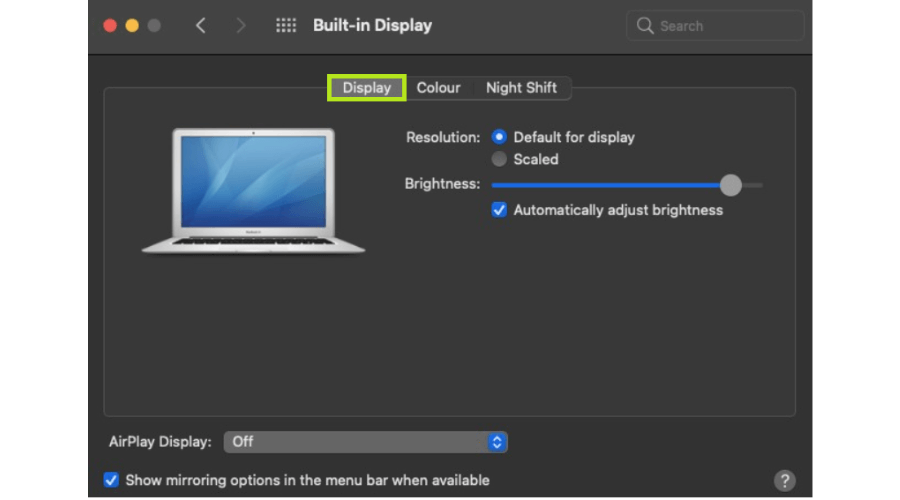
Step 6: Enable Mirroring Options:
To make mirroring easier in the future, check the box next to “Show mirroring options in the menu bar when available.
For iOS devices, swipe down to open the Control Center, tap Screen Mirroring, and choose your Apple TV. You can now mirror your entire screen or select specific content to cast.
These four alternate methods provide flexible ways to set up and use a VPN on Apple TV, depending on your technical comfort level and the devices you have available.
Final Thoughts: How to Use a VPN on Apple TV
Setting up a VPN on your Apple TV can significantly improve your streaming experience by giving you access to a wide range of content worldwide.
The methods we have covered offer flexible and efficient ways to tackle geo-restrictions, safeguard your online privacy, and enjoy most of your time on Apple TV.
From configuring a VPN on your router to using SmartDNS or creating a Wi-Fi hotspot, each approach has its own benefits depending on your needs and technical comfort level.
By setting up a VPN, you can enjoy streaming content without being restricted by location or privacy issues. Discover TV shows, movies, and sports programs from around the world while ensuring your online connection remains confidential and protected.
FAQs: Apple TV VPN Setup
1) How do I change my VPN country on Apple TV?
You need to change the server location to change your VPN country on Apple TV. If you’re using a VPN configured on your router, access your router’s settings and select a different server location from the VPN’s list of countries.
If you’re using a SmartDNS service, log in to your VPN provider’s website and switch the DNS settings to reflect a different region. After making these changes, your Apple TV will appear in the new country, allowing you to access content available in that location.
2) Which VPNs have dedicated Apple TV VPN apps?
Apple TV doesn’t support native VPN apps that are directly installed on the device. However, top VPN providers like NordVPN and Surfshark VPN offer features like SmartDNS or MediaStreamer, specifically designed to work with Apple TV. These features allow you to unlock content without needing a traditional VPN app.
3) Is Smart DNS the same as a VPN?
SmartDNS and VPNs serve similar purposes but are not the same. A SmartDNS reroutes your DNS queries through a server in a different location, allowing you to bypass geo-restrictions without encrypting your internet traffic.
On the other hand, a VPN reroutes your traffic through a different server and encrypts all your data, providing additional privacy and security. While SmartDNS is faster for streaming, it doesn’t offer the same level of security as a VPN.
4) Can I directly install a VPN app on Apple TV?
No, you cannot directly install a VPN app on Apple TV because it does not support it. To use a VPN with Apple TV, you need to set up the VPN on your router, use a SmartDNS service, create a VPN-enabled Wi-Fi hotspot on your computer, or mirror content from a VPN-enabled device like a Mac or iOS device.

